个人网站微信扫码登陆.小程序码登陆.免关注(二)
文章目录
扫小程序码登陆网站方案的 . 微信小程序部分代码和逻辑.
读取二维码传入值
前面已经说了整体流程.
网站提供一个扫码登陆的二维码.
二维码传入一个scene(场景)值.
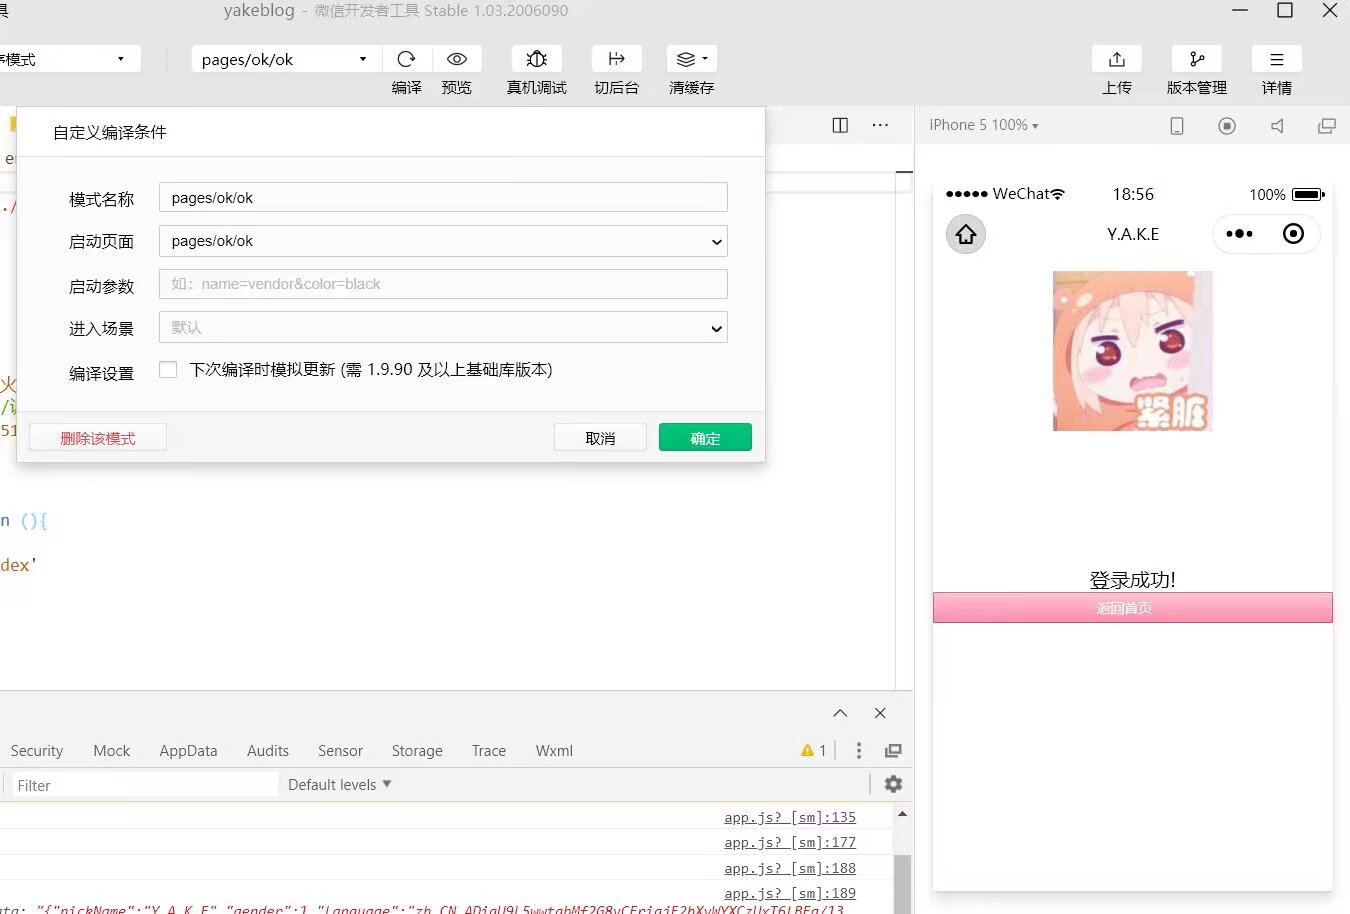
做小程序开发的时候, 新建一个 "编译模式", 启动参数 填写scene=xxxxxxxxxxxxxxxxxxxxxxxx
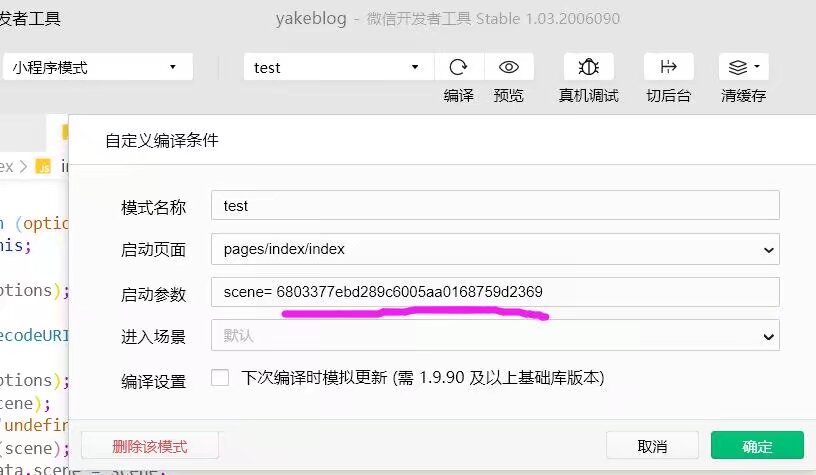
这样开发的时候,就能模拟小程序扫码后的情况.
index页面接收scene
代码主要是onLoad,当index页面运行后,自动执行onLoad
参数需要decodeURIComponent解码.
  onLoad: function (options) {
    var _this = this;

    console.log(options);

    var scene = decodeURIComponent(options.scene);

    console.log(scene);
    if (scene != 'undefined') {
      wx.reLaunch({
        url: '../login/login?scene=' + scene
      }) ;

      return;
    }
    //.............其他逻辑

}
如果检测到有参数传入小程序.那么直接wx.reLaunch跳转到login登陆页面.
Login页面wxml代码
也就是视图文件.
代码基本是官方文档直接改了下的.
非常简单.
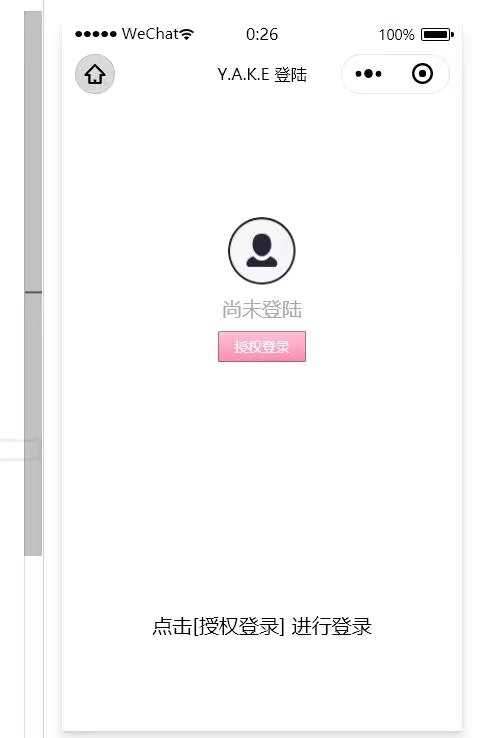
表现就是下图.
未登陆的情况
已登陆的情况

如果用户未登陆 : 一个空白头像 + "尚未登陆"提示 + 一个按钮
如果用户已登陆 : 用户头像 + 用户名提示
无论登陆不登陆,底部有个文字提示.
主要是授权登陆按钮的
open-type="getUserInfo" bindgetuserinfo="getUserInfo"
open-type="getUserInfo"是小程序调用登陆接口用的视图文件接口名,
不但按钮可以用这个,还可以图片/文字块/链接 用这个.
这是按钮,也就是点了按钮就调用 bindgetuserinfo对应的JS函数(我这里是getUserInfo).
相关官方介绍 -- > < 获取用户信息方案介绍 >
Login页面js逻辑
页面变量
  data: {
    motto: '点击[授权登录] 进行登录',
    userInfo: {},
    hasUserInfo: false,
    scene: '',
    code: '',
    encryptedData: '',
    iv: '',
    rawData: '',
    signature: '',
    host: 'https://api.getce.cn',
    canIUse: wx.canIUse('button.open-type.getUserInfo')
  }
getUserInfo
  getUserInfo: function (e) {

    console.log("点按钮,传入参数 e: ");
    console.log(e);


    var _this = this;

    console.log("点按钮, 获取 e.detail.userInfo: ");
    console.log(e.detail.userInfo);


    var errcode = e.detail.errMsg;

    console.log(e.detail.errMsg);

    if (errcode == "getUserInfo:ok") {
      //授权登陆的用户

      app.globalData.userInfo = e.detail.userInfo;

      _this.setData({
        userInfo: e.detail.userInfo,
        hasUserInfo: true
      });

      //_this.postLogin();

    } else {


      //如果用户不授权
      wx.showToast({
        title: '您没有授权登陆哦.',
        duration: 2000,
        icon: 'none'
      })


    }


  }
当用户点了 "授权登陆" 按钮后,微信小程序弹出授权提示.
(这是个同步函数,在用户点了拒绝或者允许前,控制台不会看到结果)

e.detail.errMsg == "getUserInfo:ok" 也就是用户点了允许.
如果点了拒绝那么弹出一个2秒的提示.然后退出函数.
再看下点了允许的情况.
      app.globalData.userInfo = e.detail.userInfo;

      _this.setData({
        userInfo: e.detail.userInfo,
        hasUserInfo: true
      });
setData函数
就是更新页面变量.
这里有两个
- 标记已经登陆
- 并记录登陆用户信息.
将这个两个保存起来后,页面会自动更新.变成已登陆状态.
不需要自己逻辑处理.这是小程序JS更新视图页面的更新模式.
实际上,iv,rawData,encryptedData 这里都可以得到.都可以存起来.我代码就不写了,自己加上去即可.
postLogin
注意上面的登陆还注释掉了一个_this.postLogin();
我实际用的时候是不注释的.
用户点了 "授权登陆" 按钮后 --> 点 允许 授权,会自动post数据登陆.
postLogin: function () {


    var _this = this;

    wx.showToast({
      title: '自动登陆中.',
      icon: 'loading',
      duration: 2000
    })

    //读取页面变量
    var cc = {
      'code': _this .data.code,
      'scene': _this.data.scene,
      'iv': _this.data.iv,
      'encryptedData': _this.data.encryptedData,
    }


    console.log(" 获取 post 信息 cc: ");
    console.log(cc);


    //拼接post的url
    var pushcodeurl = _this .data.host + '/v1/login/pushcode.html';


    util.post(pushcodeurl, cc).then(e => {

      //登录成功.
      console.log(" 获取 post 页面返回信息 e: ");
      console.log(e);


      if (e.data.code == '1') {
        //成功了

        wx.reLaunch({
          url: '../ok/ok'
        })

      } else {

        wx.reLaunch({
          url: '../error/error?msg=' + encodeURIComponent('登录失败,原因:' + e.data.msg)
        })


      }
    })
  }
post了根据跳转ok页面或者error页面.当然可以不需要跳转直接弹出一个提示也行.
举例,我小程序上一个错误提示.

onLoad
这个也就是页面载入的时候自动执行的函数.
前面说了,读取index传入的scene就是这个.
1.接收scene
接收方法和index中转传入的scene一样.
ps :如果和我一样用的数字+英文 不包括标点的组合,可以无需decodeURIComponent解码.
  onLoad: function (query) {
    var _this = this;

    var scene = query.scene;


      _this.setData({
        scene : query.scene,
      });

     ///...
  }
2.获取code
      //获取code,没有就同步一次
      var t_code = wx.getStorageSync('code') || "";


      //如果code空,那么还得触发login一次.
      if (!t_code) {


        wx.login({
          success: res => {
            // 记录code
            console.log("获取code 1");


            _this.setData({
               code: res.code,
            });

            //永久储存,app.js中判断code过期,这里肯定是有效的.
            wx.setStorageSync('code', res.code);

            resolve(2);
          }
        })
      }
3,自动登陆逻辑
     //获取用户信息,通过app.js页面回调
      if (app.globalData.userInfo) {
        //用户已经登陆
        console.log("onLoad:用户已经登陆");


        _this.setData({
          motto: '如果没有自动登陆,请点击 头像 进行登录',
          userInfo: app.globalData.userInfo,
          hasUserInfo: true
        });


        //_this.postLogin();

      } else if (_this.data.canIUse) {
        // 由于 getUserInfo 是网络请求,可能会在 Page.onLoad 之后才返回
        // 所以此处加入 callback 以防止这种情况
        console.log("onLoad:用户未登陆,定义回调函数,userInfoReadyCallback");


        app.userInfoReadyCallback = res => {
          console.log("onLoad:用户未登陆,定义回调函数,userInfoReadyCallback,内部res : ");
          console.log(res);

          app.globalData.userInfo = res.userInfo


          _this.setData({
            motto: '如果没有自动登陆,请点击 头像 进行登录',
            userInfo: res.userInfo,
            hasUserInfo: true
          });

          //_this.postLogin();

        }
      } else {
        // 在没有 open-type=getUserInfo 版本的兼容处理
        console.log("onLoad:老设备兼容处理");

        wx.getUserInfo({
          success: res => {

            app.globalData.userInfo = res.userInfo


            _this.setData({
              motto: '如果没有自动登陆,请点击 头像 进行登录',
              userInfo: res.userInfo,
              hasUserInfo: true
            });


            //_this.postLogin();
          }
        })
      }
这里有3种情况.
1,app全局变量有用户信息.将全局变量的用户信息同步到login页面. (这部实际可以省略)
2,全局变量没有用户信息,然后去调用app.js的userInfoReadyCallback 回调函数.异步获取.
如果用户有登陆授权过,那么会自动获取并更新用户信息,并异步返回.
如果用户没有登陆,那么不返回.
3,兼容低版本微信APP用户.
App.js逻辑
app.js是一个全局js.
全局变量
  globalData: {
    userInfo: null,
    iv:'',
    signature:'',
    encryptedData:'',
    rawData:''
  }
主要是用户信息.
onLoad
它的执行仅晚于index.js 的onload
主要逻辑有两部分
1.测试code有效期
    wx.checkSession({
      success: function (res) {
        console.log("处于登录态");

        var t_code = wx.getStorageSync('code') || "";


        //如果缓存是空的
        //那么重新换取登陆code
        if (!t_code) {

          wx.login({
            success: res => {
              // 发送 res.code 到后台换取 openId, sessionKey, unionId
              getApp().globalData.code = res.code
              wx.setStorageSync('code', res.code);

            }
          })

        } else {
          getApp().globalData.code = t_code;
        }


      },
      fail: function (res) {

        console.log("需要重新登录");

        wx.login({

          success: res => {
            // 发送 res.code 到后台换取 openId, sessionKey, unionId
            getApp().globalData.code = res.code
            wx.setStorageSync('code', res.code);

          }
        })
      }
    })
如果code失效了就更新.反正保证code是能用的.
code是用永久存储存起来.
2,获取用户信息
    // 获取用户信息
    wx.getSetting({
      success: res => {
        if (res.authSetting['scope.userInfo']) {

          // 已经授权,可以直接调用 getUserInfo 获取头像昵称,不会弹框
          console.log('已授权:scope.userInfo');

          wx.getUserInfo({
            success: res => {

              this.globalData.userInfo = res.userInfo;

              //this.globalData.signature = res.signature;
              //this.globalData.iv = res.iv;
              //this.globalData.encryptedData = res.encryptedData;


              console.log('app.js页 获取wx.getUserInfo:' );
              console.log(res);

              // 由于 getUserInfo 是网络请求,可能会在 Page.onLoad 之后才返回
              // 所以此处加入 callback 以防止这种情况
              if (this.userInfoReadyCallback) {
                this.userInfoReadyCallback(res)
              }
            }
          })
        }
      }
    }
调试/开发小技巧
回到未登陆状态
测试的时候,有个清理缓存的功能.全部清除,可以恢复到未登陆状态.测试代码需要.

调试特定页面
开发的时候,我们有些页面要调试某个页面/做某个页面开发
可以新建一个编译模式,将启动页面设置你要调试的页面.